Today I want to tell to you about what I use the vSphere plugin for regularly in my lab to hopefully help you get more value out of your existing Pure array and tools. The assumption of this guide is that you already have the vSphere plugin installed (follow this guide if you don’t currently have it installed or would like to upgrade to a more feature-rich remote plugin version). Our vSphere plugin release notes KB covers the differences between versions. If you aren’t sure what version you want, use the latest version.
Why should you care about the vSphere plugin and why would I highlight these workflows for you? Pure’s vSphere plugin can save you a significant amount of time in the configuration/management of your vSphere+FlashArray environment. It can also greatly reduce the barriers to success in your projects by reducing the steps required of the administrator for successful completion of a workflow. Additionally, you might currently be using the vSphere plugin for a couple of workflows but didn’t realize all of the great work our engineers have put into making your life easier.
I am planning to write more blogs on the vSphere plugin and the next one I plan to write is on the highest value features that exist in current vSphere plugin versions.
Create and Manage FlashArray Hosts and Host Group Objects
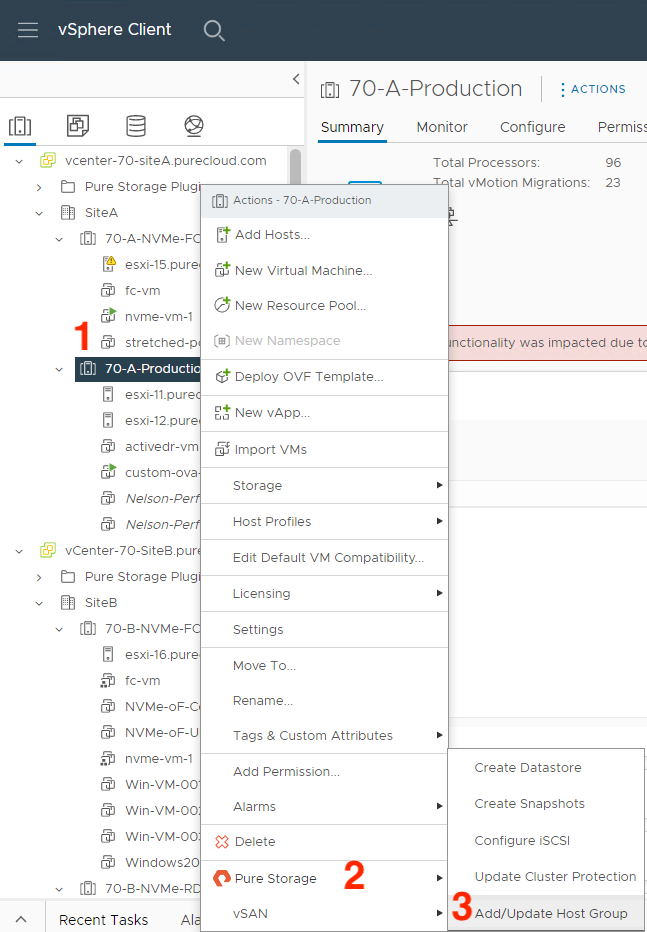
If you’re currently a Pure customer, you have likely managed your host and host group objects directly from the array. Did you know you can also do this from the vSphere plugin without having to copy over WWNs/IPs manually? (1) Right-click on the ESXi cluster you want to create/manage a host or host group object on, (2) hover over Pure Storage, then (3) left-click on Add/Update Host Group.

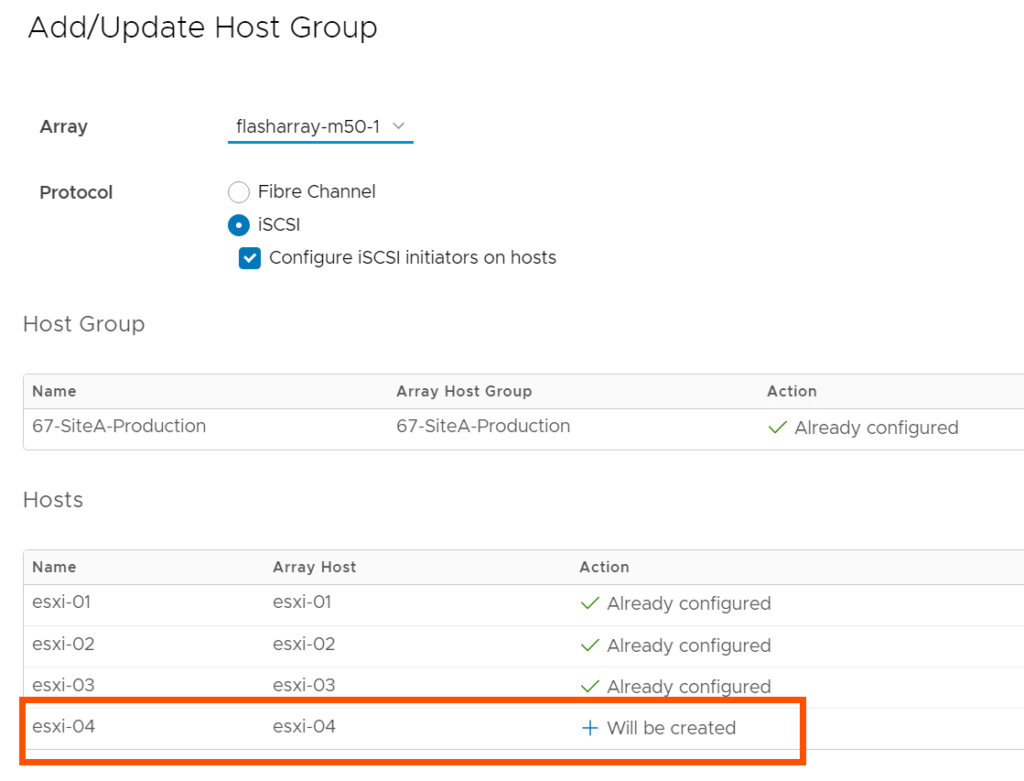
In this menu, there are currently Fibre Channel and iSCSI protocol configuration options. We are currently exploring options here for NVMe-oF configuration; stay tuned by following this KB. You can also check a box to configure your ESXi hosts for Pure’s best practices with iSCSI, making it so you don’t have to manually configure new iSCSI ESXi hosts.

FlashArray VMFS Datastore and Volume Management (Creation and Deletion)
There are a lot of options for VMFS volume management in the plugin. I’ll only cover the basics: creation and deletion.
When you use the plugin for datastore creation, the plugin will create the appropriate datastore in vSphere, the volume on the FlashArray, and it will connect the volume to the appropriate host(s) and host group objects on the FlashArray. (1) Right-click on the pertinent cluster or host object in vSphere, (2) hover over Pure Storage and finally (3) left-click on Create Datastore. This will bring up a wizard with a lot of options that I won’t cover here, but the end result will be a datastore that has a FlashArray volume backing it.

The great thing about deleting a datastore from the plugin is that there are no additional steps required on the array to clean up the objects. This is the most satisfying workflow for me personally because cleanup in a lab can feel like it’s not a good use of time until I’ve got hundreds of objects worth cleaning up. This workflow enables me to quickly clean up every time after I’ve completed testing instead of letting this work pile up.
(1) Right-click the datastore you want to delete, (2) hover over Pure Storage and (3) left-click on Destroy Datastore. After the confirmation prompt, the FlashArray volume backing that datastore will be destroyed and is pending eradication for whatever that value is configured on the FlashArray (default 24 hours, configurable up to 30 days with SafeMode). That’s it!

FlashArray Snapshot Creation
One of the benefits of FlashArray is its portable and lightweight snapshots. The good news is that you can create these directly from vSphere without having to log into the FlashArray. It’s worth mentioning that although the snapshot recovery workflows built into the vSphere plugin (vVols and VMFS) are far more powerful and useful when you really need them, I’m covering what I use regularly and I rarely have to recover from snapshots in my lab. I try to take snapshots every time I make a major change to my environment in case I need to quickly roll-back.
There are two separate workflows for snapshot creation: one for VMFS and one for vVols. The granularity advantage with vVols over VMFS is very clear here- with VMFS, you are taking snapshots of the entire VMFS datastore, no matter how many VMs or disks are attached to those VMs. With vVols, you only have to snapshot the volumes you need to, as granular as a single disk attached to a single VM.
With VMFS, (1) right click on the datastore, (2) hover over Pure Storage and (3) left click on Create Snapshot.

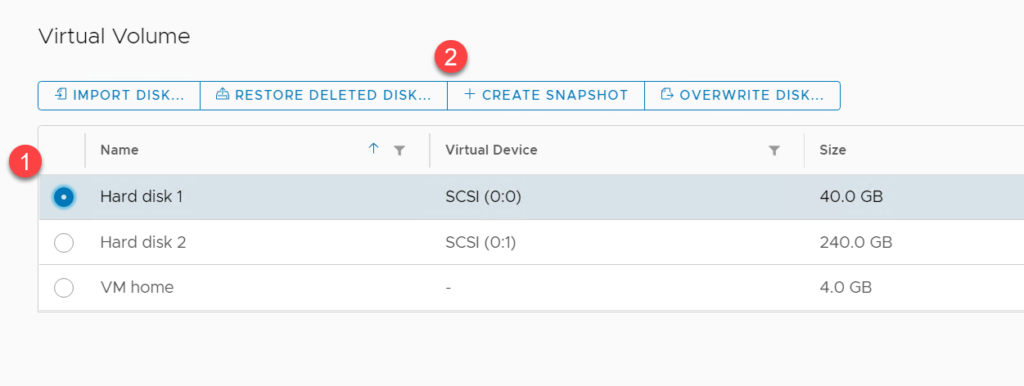
For a vVols backed disk, from the Virtual Machine Configure tab, navigate to the Pure Storage – Virtual Volumes pane, (1) select the disk you would like to snapshot and (2) click Create Snapshot.

A prompt will pop up to add a suffix to the snapshot if you’d like; click on create and you’ve got your FlashArray snapshot of a vVols backed disk created!

Stay tuned for a blog on the vSphere plugin features you might not know about that, like the above, can save you a significant amount of time and effort.

Nice one Nelson!